September 13, 2011

Sam McHorne and the Devil Dogs

s. Mainly this has been due to work but I must admit that I have found a computer game that I am really enoying - Terraria. It is not often that I really invest myself in a game but all my scant free time has recently been devoted to this one.

I have been incredibly distracted over the last two weeks. However yesterday I left my computer in work deliberately so I couldn't play and I got back to doing some painting for a change. This gave me the chance to put some finishing touches onto the Devil Dogs! I still need to give the bases some attention and with that in mind I will be ordering some basing materials from Antenocitis Workshop today. Brass etched plants and some grass tufts are what I am planning on using.

September 6, 2011

The Talon Fail

So I managed to get my Talon to a nearly finished state. I am really unhappy with him however! While the weathering came out generally fine I think it really suits a display piece more and the amount of effort I have still to do to match all the surfaces to this weathered standard probably isn't worth it. I will drop this fellow into some paint stripper this week so I can restart at the weekend. While everything, in weathering terms at least, worked out as I wanted it to I haven't been able to get the grey correct. The scheme is boring and dull for a start. I have picked up about five more vajello greys so I think I can still go for grey but I need to find a more interesting shade. I have found that their military range really has some lovely colours especially in greens, browns and greys. I will have to spend some more time figuring out what is best but I am impressed so far!

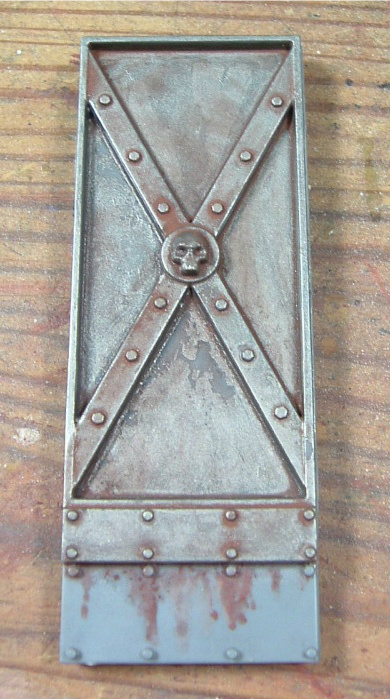
The shield worked out a lot better than I thought it might after I had made a few mistakes. The weathering is a little heavy on the bottom but at least it gives a good showing as to how effective the rust washes can be. This surface looks really like it has been out in the weather for a while. The streaks came out okay too though I had to doctor them a little with some basecoat. I am able to get a good streak effect but I am not really able to get it to look small, instead I end up with a really big streak. Breaking this up with some of the original colour is fine enough but I could probably then just paint on the streaks and not have to mess around with turpentine and pigments. I also put some mud effects on parts of the shield. You can see this on top of the boss. I just wanted to see how it might work. I applied it far too heavily but in general it seems fine. Again less is more...

So for me it is off to German Class, this evening I can get this little 'jack into the tub of stripper along with the Nomad so that maybe by the weekend I can have them ready to restart. It's a pity but it has to be done.

September 5, 2011

A symbol for the Mercs

So I was thinking a little bit more about my Mercenaries and I was thinking that unlike the Cygnarian or Menite Warjacks they don't really have a symbol anywhere. While the mercenaries are not a faction in their own rights I think it would be nice to unify them a little bit more than is usual. The 'jacks all belong to one 'caster and are a unit right? So why not give them a symbol. I decided to try out the one that Privateer Press suggest. The Nomads shield was the first to get some attention! I am not really sure where else I can place this on a lot of the Warjacks of the faction but I guess I can find a place somewhere.

September 2, 2011

Weathering the Nomad

I also was working on my Nomad at the same time as the Talon I showed on Monday. So I made the same mistakes! This shot gives a good view of the effect of the turpentine wash. I have since found a better method for the washes, well I wouldn't call it a better method but a better use of this one. Basically I should have just layered some rust washes on like I showed yesterday rather than just one. Well these 'jacks are very much trial pieces for when I start on my Khador ones. I added a little bit more salt to this fellow as he is that much bigger. I also guessed that he must get bashed around a lot more too! I packed the salt on especially on the engine as I wanted to see what can be achieved. In these shots you can make out the weathering pigment a little better than on the shots of the Talon. If I was to do this again I would add a lot more varied shades to build up a better effect.


So I once again followed it up with a nice flat grey basecoat. I am a little worried that this scheme will be boring. I picked up some better greys from Vajello on the way home yesterday and I probably should have gone with something a lot darker. I will accent the models with a very dark trim but I am still worried they will be boring. I am hoping that the weathering can make them stand out. I am hoping that over the weekend I can dedicate a day or so to getting these guys finished off but thats probably a little too ambitious. Getting the Talon done would be enough for me! I have been wondering a little about the basing scheme as well. I think something a little more green than usual would also offer a nice contrast and make the models stand out better. Anyway I have to examine some of the newer products I have seen out. Those grass tufts look awesome and I would like some brass etched plants too. I haven't seen anyone really use them much before.

September 1, 2011

Rust: my new method

Well I have been swamped with work this week. It seems that the second I find a hobby project I am enthusiastic about I have to spend my evenings in the office instead. So I haven't really been able to put up the posts I wanted as I wasn't able to get everything finished. However I did manage to experiment a little more with some rust techniques and here are a series of photos of the result. Here I had just base coated the top section silver and put on the first wash. The wash is made up of turpentine and some rust pigments. As you can see I was a little eager in my efforts and I removed some of the silver base coating. Thats fine as once everything was dry I could add some more and continue with the process. This usually dries quickly but I sped up the process a little by using a hair dryer. i think I will have to start using one more often as it really helps! This second shot shows the third more yellow coat having been applied in the same manner as the previous two. With each coat I simply changed the colour of the rust going from dark to light. When it is wet it looks terrible but as it dries it starts to look more and more awesome! You can see here that the previous trouble I had with the basecoat is fixed. The silver I painted on afterwards can't be distinguished at all. I want to use this effet on the 'jacks where there is bare metal showing. It should look fine I guess the only problem I forsee is trying to restrict the washes to where I want them. The turpentine based washes really just go everywhere. By varying the extent and colours of the wash I am guessing that it can really be used to make interesting visual effects. I am suprised at how the colours build up and I am looking forward to trying it with other colours to emulate effets like a dust patina or rain run off on armour. So I need to study a little more and see what I can manage to fit on a 'jack!

About Me

Friends