
First thing to say... this is a big 'jack. Thankfully he is done and my wrist is thankful. Just holding this guy up while painting is a punishment. Putting this guy side by side with the older chassis for Menoth really shows the difference. I wanted to keep him whiter than he usually tends to be painted and so I kept the central armour plate white rather than bordering it in red. I black lined the plate but it doesn't come out in these shots.
![]()
I need to find a way to diffuse the light better so that it shows up the subtlety a little better. I have seen a lunch box with a hole cut in it to fit the camera used! The white comes out very flat in these photographs and while in reality it is very stark there is some shading there believe me! I am going to copy this scheme on the Reckoner who I am looking forward to fielding. With a big gun and the assault order he seems to be much more straightforward. I have no idea how to use this 'jack on the battlefield. He really seems to be a decent 'jack but he is much more specialised and expensive when compared with the Crusader. He seems to be very useful against infantry but getting him that close is always dangerous. The two open fists are a nice benefit and allow him to deal with other warjacks via power attacks. I am looking forward to a field test in the next few weeks.
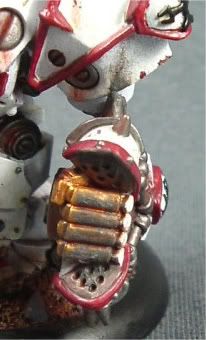
Here is the finished smoke and soot effect I attempted on the fist. Its not perfect thats for sure. I have no idea how to make it better though. The vents under and over the fist should be billowing smoke. Therefore it should leave a dark grey or black residue. So I used Carbon Black from the Vajello pigments range to try to achieve this. Interestingly this when mixed with a little water looses the black colour and instead goes an almost metallic grey. Using water to temporarily fix the pigments I put this on the surfaces along the fingers where I thought that the soot would leave a stain. As this area is in close and constant contact with the smoke I built up some more layers to give a rough texture to the area. I also trailed this from the individual vents. The picture shows this only a little as the pigment blends a little with the darkened mettalic area. The other thing I tried to achieve was a smoke effect from the mini smoke stack on the arm. This should leave a stain on the shoulder. I think I didn't do enough weathering here.
I think I could get away with a good bit more. However I am hesitant as the main problem I have had with weathering so far is over doing it. I also tried the effect on the under head vents like with the Redeemer. This shot is not a great illustration of this however I have noticed that the pigment works very well over the red. Maybe white is a bad colour for weathering over?
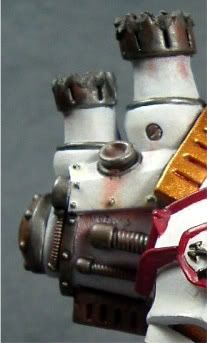
This shows the engine from the side a little better. The weathering here has really started to look like how I am expecting it to. This process is a tough one to get right as the smallest amount of pigment can have a startling effect and it is a difficult medium to control. Despite all the tutorials on the web describing various ways to achieve rust streaks the best way I have found is to brush the pigment on without any additions. Maybe this is due to the fact of putting it on over white. With a stronger colour as the base maybe this wouldn't have such a strong effect. I know while practising on my Ork Truk that the pigment wasn't as strong at all and that was over a light yellow base. The one thing this way of applying the rust doesn't achieve is a gradual weakening of the streak. This way keeps the streak weak throughout whereas the other people doing this manage to have a very strong beginning and then have the pigment wash out towards the end of the streak. They can achieve this over a really short area too. So I still have a lot to learn. Thankfully the local deals have continued and I have managed to pick up a good few new 'jacks.

 First thing to say... this is a big 'jack. Thankfully he is done and my wrist is thankful. Just holding this guy up while painting is a punishment. Putting this guy side by side with the older chassis for Menoth really shows the difference. I wanted to keep him whiter than he usually tends to be painted and so I kept the central armour plate white rather than bordering it in red. I black lined the plate but it doesn't come out in these shots.
 I need to find a way to diffuse the light better so that it shows up the subtlety a little better. I have seen a lunch box with a hole cut in it to fit the camera used! The white comes out very flat in these photographs and while in reality it is very stark there is some shading there believe me! I am going to copy this scheme on the Reckoner who I am looking forward to fielding. With a big gun and the assault order he seems to be much more straightforward. I have no idea how to use this 'jack on the battlefield. He really seems to be a decent 'jack but he is much more specialised and expensive when compared with the Crusader. He seems to be very useful against infantry but getting him that close is always dangerous. The two open fists are a nice benefit and allow him to deal with other warjacks via power attacks. I am looking forward to a field test in the next few weeks.
 Here is the finished smoke and soot effect I attempted on the fist. Its not perfect thats for sure. I have no idea how to make it better though. The vents under and over the fist should be billowing smoke. Therefore it should leave a dark grey or black residue. So I used Carbon Black from the Vajello pigments range to try to achieve this. Interestingly this when mixed with a little water looses the black colour and instead goes an almost metallic grey. Using water to temporarily fix the pigments I put this on the surfaces along the fingers where I thought that the soot would leave a stain. As this area is in close and constant contact with the smoke I built up some more layers to give a rough texture to the area. I also trailed this from the individual vents. The picture shows this only a little as the pigment blends a little with the darkened mettalic area. The other thing I tried to achieve was a smoke effect from the mini smoke stack on the arm. This should leave a stain on the shoulder. I think I didn't do enough weathering here.
  I think I could get away with a good bit more. However I am hesitant as the main problem I have had with weathering so far is over doing it. I also tried the effect on the under head vents like with the Redeemer. This shot is not a great illustration of this however I have noticed that the pigment works very well over the red. Maybe white is a bad colour for weathering over?
 This shows the engine from the side a little better. The weathering here has really started to look like how I am expecting it to. This process is a tough one to get right as the smallest amount of pigment can have a startling effect and it is a difficult medium to control. Despite all the tutorials on the web describing various ways to achieve rust streaks the best way I have found is to brush the pigment on without any additions. Maybe this is due to the fact of putting it on over white. With a stronger colour as the base maybe this wouldn't have such a strong effect. I know while practising on my Ork Truk that the pigment wasn't as strong at all and that was over a light yellow base. The one thing this way of applying the rust doesn't achieve is a gradual weakening of the streak. This way keeps the streak weak throughout whereas the other people doing this manage to have a very strong beginning and then have the pigment wash out towards the end of the streak. They can achieve this over a really short area too. So I still have a lot to learn. Thankfully the local deals have continued and I have managed to pick up a good few new 'jacks.
Looks nice Phil! I really like the enginepart.
ReplyDeleteI had a few games against a Castigator and i really hate his combustion ability.^^
-Lars
Hi there, I have done some product trials and reviews for Mig Pigments and for Forgeworld with their pigments and might be able to add a tiny bit of advice.
ReplyDeleteAnother way to work (and one I like for over white)is to pre dilute the pigment in a great deal of thinner. This requires regular stirring to keep the particulate in suspension rather than settling. This allows for really controlled application though it also requires repeated applications/layers to build it up in areas of higher concentration. But following the old adage it always easier to add more than take it away really applies here.
Also a pigment fixer (Mig makes one) can be really an asset as well.
Keep painting!
James Craig