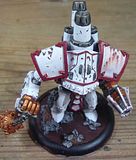
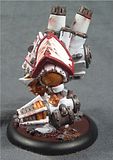
 This is my base coated Vanquisher just before I got busy chipping and weathering. This was shaded prior to the weathering as I didn't think that I would manage it afterwards. Shading is simply a wash of GW bleached bone and once that has dried overnight some black lining along the pronounced areas. This was tidied up with a reapplication of white in the most raised areas. Nothing very inventive in that! While letting all that dry I continued with the base. I generally paint the bases first as it saves accidentially getting paint splashed from the base on the model. I stuck with the standard swamp bases as I have with the rest of the army. The one thing I don't like however is how often I manage to make the 'jack look like he is standing on a little island. I did this once again and I am unimpressed! However with the other 'jacks I have planned I will be watching out to avoid this. The distiction between making a land base with a water feature and making a water base with a land feature is huge.
 This picture shows what I did with the chpping and the pigments. You can click on it to enlarge it. Firstly I had a lot of difficulty with the chipping. I am not sure if it is the hairspray or my failure. I would like to blame the hairspray. I actually used a very expensive one and maybe the cheaper ones would give a better effect. I could not for the life of me manage to get it to chip with a stiff paint brush. I have no idea how that is possible. After stabbing the model in various places for five minutes nothing had happened. I had wet the area as advised but still nothing. I then took out a cocktail stick (small wooden stik used at parties for sausages). I wet this and softened the top of it a little. After some strong words I managed to get a chip on the left shoulder pad. I tried a second time and managed to lift the undercoat off also. There were some strong words again. I continued and I was able to make the chips but not in a great way. I lifted a lot of undercoat off in places.
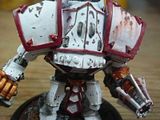
 This close up shows the chips a little better. The central part of the jack, above where the head goes came out really poorly. I stupidly placed the chips pretty much equidistant from the others giving a really false look. I also made them far too big. Next time I will try to reign in my impulses. However on the small area just below this I really managed to get some nice hips done. How they came out so good here I have no clue. Maybe it is the smaller area? I then proceeded to do the leg armour which also came out fine. The minimalist look is definitely the way to go. One thing I did notice is that by wetting the area some of the white paint will soak it up and begin to move around. This is okay but you have to be careful not to let it spread over the chips and dry as it gives them a terrible milky look.
 Once the chips were down... I mean done I got busy with the pigments. I have to say these will be a great addition to my painting repetoire. However at the moment they are a complete annoyance. Learning new techniques for these is not easy. On the left shoulder pad ('jacks left) I followed the method described here. This involves applying the pigment and then with a damp brush streaking it downwards, or stumping it as described on that guide. Well I used too much turpentine and my brush was wet rather than damp. I probably also used way too much pigment. I made massive red streaks down the should pad. So to rectify that I attempted to remove some of the excess with a clean wet brush. This helped a lot and also changed the colour of some of the rust. There is a stronger orange colour on this shoulder pad than elsewhere on the model where the rust is much more red. I am guessing this was just a result of thinning with the turpentine. I did go back later and touch up a few places with white paint to make the streaks look a bit more natural.
 The right shoulder pad and elsewhere were done using the guide found here. Basically I applied the rust powder in clumps and flooded the area with turpentine. I then let this dry (very important to let it dry fully!) and then with a stiff brush streaked it downwards. The first thing to note is that I used far less pigment powder on the right shoulder pad. This meant smaller steaks. Also I didn't go straight downwards with these. For some silly reason I went off at an angle and so the rust doesn't look quite as good in my opinion. However this method with less pigment seems good. I didn't achieve the nice orange the otherside has however. I also came back later to touch up this side. I mixed water with the powder on a palette and then applied some fine lines within the streak. This darkened the centre and with a little more practice should look good.
So this is model one of the weathering experiment. I can't say I am happy with it. It is a good beginning I hope. The most important thing I learned is not to overdo it. I thought I was being conservative but looking at the model I really went over the top. The central piece of the 'jack is the worst. It looks terrible and while the shoulder pads are not that fantastic either they are ruined by the monstrosity between them. So with this in mind I have cleaned and glued together a Crusader Warjack. I managed to pick it up cheap also which was nice. I will begin with it at the weekend and hopefully the next part of my weathering experiment will go better. One excuse I will make is that white is unforgiving for an experiment like this. I guess it would be easier to weather models on a darker basecoat than white!
Part One
Part Two

No comments:
Post a Comment