 So I picked Rutger up cheap at the weekend and last night I sat and got him finished. Painting Solo's is great as they can be done very quickly and give you a nice sense of achievement. I will probably use him in my mercenary list but I need to pick up a 'jack for him to marshal and his partner Taryn di la Rovissi. I spotted her cheap too so I might go back this weekend and pick her up. I have no idea what 'jack suits Rutger's drive though, any help? The ability to reroll a failed hit is fine but who really benefits from that the most, I was thinking a Mangler first. However it is hard to get flank and thresher to work together perfectly. If Rutger had reach though that would be perfect...

September 29, 2011
Rutger Shaw
So I picked Rutger up cheap at the weekend and last night I sat and got him finished. Painting Solo's is great as they can be done very quickly and give you a nice sense of achievement. I will probably use him in my mercenary list but I need to pick up a 'jack for him to marshal and his partner Taryn di la Rovissi. I spotted her cheap too so I might go back this weekend and pick her up. I have no idea what 'jack suits Rutger's drive though, any help? The ability to reroll a failed hit is fine but who really benefits from that the most, I was thinking a Mangler first. However it is hard to get flank and thresher to work together perfectly. If Rutger had reach though that would be perfect...
September 28, 2011
Dystopian Popsicle
As a break from Warmachine I pulled out some Dystopian Wars stuff to paint. I had ordered this Dreadnought quite a while ago but it took ages for Maelstrom Games to send it out. By the time it arrived my impetus to play was pretty much gone. Anyway the only way I have found to paint the Dystopian Wars stuff is to mount it on something else, hence my nice Prussian Popsicle. The Dreadnought is rather heavy for a resin miniature so it took two coffee stirrers (donated kindly by the Cafe near work) to get something stable.
 I did some of the detail work first as I wanted to experiment. The Iron Cross you see here is out of proportion, but only when viewed directly. When viewed from the normal angle of about 45° it is actually looks fine. I wanted to paint the ships name on also but I can't figure out where and I cant figure out if it is worth the trouble. I would have to paint it exceedingly small and then it wouldn't really be noticable. I wonder did ships of this time have names emblazoned on them at all?
 I had ordered this Dreadnought quite a while ago but it took ages for Maelstrom Games to send it out. By the time it arrived my impetus to play was pretty much gone. Anyway the only way I have found to paint the Dystopian Wars stuff is to mount it on something else, hence my nice Prussian Popsicle. The Dreadnought is rather heavy for a resin miniature so it took two coffee stirrers (donated kindly by the Cafe near work) to get something stable.
 I did some of the detail work first as I wanted to experiment. The Iron Cross you see here is out of proportion, but only when viewed directly. When viewed from the normal angle of about 45° it is actually looks fine. I wanted to paint the ships name on also but I can't figure out where and I cant figure out if it is worth the trouble. I would have to paint it exceedingly small and then it wouldn't really be noticable. I wonder did ships of this time have names emblazoned on them at all?
September 27, 2011
Harlan Vresh
 I bought this guy a long time ago. I was pretty suprised when he arrived and I was finally able to read his rules. I couldn't use him with my menites. So he was relegated to the back of the lead pile. Pity as he really is a nice model. So now that I have a burgeoning mercenary force I can use him... well no I can't. He won't work with the undead so I have to choose between Alexia and him. I realised this a little late as I was already halfway through painting him. I guess mercenaries must be a very difficult thing for Privateer Press, or any games company, to deal with. They are basically models that just won't sell like any standard faction ones. Choice must be restricted by the definition of being a mercenary, there are very few that will work for everyone! So you cut down the number of players that can use him by a good bit. Then unless he provides something very unique he (it) will be neglected for in-faction models. So in a lot of cases it comes down to how the model looks.
 Thats exactly why I bought Harlan, he is a pretty cool model. Thankfully he will work for my Khador force. I just need to sit and start thinking about exactly what I want to accompany him with. I have been buying a good few 'jacks but I haven't bought any infanty yet. Someday soon I will sit down and plan out a list! Painting Harlan was a nice experience. He isn't overly encrusted with detail. The jacket covers most of the model and other than that he only has a few other cloth areas. I was able to get him done really quickly, at least in comparison to a unit. Thats great for motivation! Slogging my way through units really eats my motivation. I don't know if I could manage a real Warhammer army anymore...
September 26, 2011
Alexia, Mistress of the Witchfire
 So that last of the Risen, well she isn't really one of the Risen I guess. So I sat down yesterday and got through painting her. The base isn't done as I wasn't sure if I should flock it or what. I will just cover it up as best I can once my grass tufts eventually arrive (ordering them might help with that!). She was actually fun in places to paint. I usually suck badly at doing cloaks but this time it came out fine. I didn't overhighlight for a change on the grey. I actually shaded it in purple to offer a good contrast with the green blade but it doesn't come out well here. The red clothing I shaded rather than highlighted as I wanted a really deep red, again with a hint of purple in the depths. It probably needs some definition as it is dull now. The metallics came out perfectly without having to do too much work. I got a little lucky I guess, throw enough mud at a wall and some of it will stick!
 Here is the full unit. I am pretty happy with how they turned out. It took me a little longer than I would have liked, especially as I didn't put that much effort into them. So my Mercenaries are slowly turning into an army. I have Croe's Cutthroats back in Ireland, whom I shall collect in a few days time. I just need to get my 'Jacks done and then I am all set for a game. I did some work on my Nomad and I didn't have to strip him as I feared though the Talon is bound for a swim in some nail varnish remover. So maybe I can get them done and then some Steelheads and well I will have a fairly nice army in a few weeks. I just need a few tournaments to start attending now...
September 23, 2011
Khadoran Dead
 So back to the Risen... I guess it is best to get them all done as soon as possible as I am quickly losing the motivation to continue with them. It is a fairly large unit in Warmachine terms and I think I am more conditioned now to painting in batches of six. I had wanted to pick up some reinforcements to bring this unit up to its full compliment of twenty but thats almost doubling what I have to do and I am not too enthusiastic about having to do that. I guess I will have to eventually though... I am eager to get to some Steelheads first though.
September 22, 2011
Drake McBain
 I got bored of the Risen and did some work on Drake instead. I actually finished him (despite the fact I am unhappy with the paintjob). I went once again with grey but I really am not that good at highlighting it. I think I am just shading it too dark to begin with and that gives too much of an uncontrolled contrast. In certain places it worked out fine, the right (left in picture) knee-pad. However in other areas, such as the chest piece it didn't work. The contrast there is too strong with the shadows being far too defined.
 The metals are fine though I would have hoped to get the silver done a little better. I have always struggled with metallics and silver especially. I just find it impossible to blend one into the other effectively. It isn't so harsh with gold but with silver I can always see the line. I guess working direct from Boltgun Metal (GW) to Mithril Silver (GW) isn't the best receipe... I will have to go out and buy new metallics soon anywy. I am wondering are there any better ones than the Games Workshop metallics, P3, Vajello or Coat d'Arms?
September 21, 2011
Dead Cygnarians
 I guess Cygnarian is the correct term? Well I finally managed to sit and get some painting work done. Thankfully the Risen can be painted rather quickly if you skip a few steps here and there. I relied a lot on washes to get these close to being done and the effect is a good one. The only thing to note is the verdigris on the bronze/copper areas. I use a mix of Hawk Turquiose (GW) and Green Ink with some matte medium. Washing that over the area works out fine. I would like to give a white wash to this area but for now it is fine. I need to practise a little more with white washes in a less conspicuous area of a model.
September 20, 2011
Thrall Warrior
I imagine this will be the week of the Risen. I have basecaoted Drake McBain but I haven't looked at him since.  Last night I woked on the Thrall Warrior as I didn't have much time. I was being brought to the cinema, so that claimed my evening. I am not sure how happy I am with the rust on the armour. I didn't use the exact washes I used on the sword last week and so it is rather more dull. There isn't a lot of contrast in the tones either. I think I will go back and add some brighter orange, maybe even some yellow, to give the contrast some strength. I am not sure... this rust thing isn't easy! Most of the time is works out fine but the rest of it turns out really different from what I was hoping for. I have to remember that these are just gaming pieces... they don't have to be a work of art!
 Last night I woked on the Thrall Warrior as I didn't have much time. I was being brought to the cinema, so that claimed my evening. I am not sure how happy I am with the rust on the armour. I didn't use the exact washes I used on the sword last week and so it is rather more dull. There isn't a lot of contrast in the tones either. I think I will go back and add some brighter orange, maybe even some yellow, to give the contrast some strength. I am not sure... this rust thing isn't easy! Most of the time is works out fine but the rest of it turns out really different from what I was hoping for. I have to remember that these are just gaming pieces... they don't have to be a work of art!
September 19, 2011
Risen Rising
I have finally managed to get the Risen to my painting table! They have been sitting in my cupboard stores for a while. I try not to open it up too much as someday everything I have been piling up in there will just spill out and I will never be able to get it all back in. Anyway I have the basecoats done for the grunts and I will get these fellows finished over the course of the week I am hoping. I haven't done too much in terms of effort to get these finished. They are far too numerous for me to pay attention to and to highlight everything, especially bone. I have always hated painting skeletons as bone is a really annoying thing to have to highlight. There are far too many surfaces to worry about (and forget). I continued with the rust pigments on the metals and so far so good. You can see them here on the armour plates on the shoulders. I will tackle the Cygnar style ones this evening or maybe finish the Thrall Warrior.
 Anyway I have the basecoats done for the grunts and I will get these fellows finished over the course of the week I am hoping. I haven't done too much in terms of effort to get these finished. They are far too numerous for me to pay attention to and to highlight everything, especially bone. I have always hated painting skeletons as bone is a really annoying thing to have to highlight. There are far too many surfaces to worry about (and forget). I continued with the rust pigments on the metals and so far so good. You can see them here on the armour plates on the shoulders. I will tackle the Cygnar style ones this evening or maybe finish the Thrall Warrior.
September 17, 2011
Master and Commander
Wow time flies, I can't believe it is already over halfway through September. I haven't done a book review here for a long long time and this is because I have (and still am) been reading Patrick O Brian's Aubery - Maturin series. Its twenty one books in total and I just got over the halfway hump.  I have to say this is probably the most rewarding series I have ever read. I really haven't come across anything quite so refined before. The language is excellent and I have found myself in wikitionary quite often trying to find out what to wear a ship or the weathergage means. Thankfully I haven't as yet started using nautical terms in my day to day speech. Anyway the series describes perfectly the nautical life of the early nineteenth century. It does this in staggering detail that can seem overwhelming. The narrative however has an excellent device in the doctor. As a Landman he needs to have everything explained to him and this covers all the most important details. Even after the eleven books I have read this is still the case. Having wiktionary close at hand is always helpful however as some of the words are not explained. These are most often non nautical terms such as cove that come up quite often. The books don't just concentrate on the Navy but also on the unfortunate times that Captains were without a ship and must survive the landsharks.
So I don't want to reveal too much of the books just yet and I want to keep my final review for when I have finished the full series. However I can recommend that you pick them up, you won't be able to put them down!
 I have to say this is probably the most rewarding series I have ever read. I really haven't come across anything quite so refined before. The language is excellent and I have found myself in wikitionary quite often trying to find out what to wear a ship or the weathergage means. Thankfully I haven't as yet started using nautical terms in my day to day speech. Anyway the series describes perfectly the nautical life of the early nineteenth century. It does this in staggering detail that can seem overwhelming. The narrative however has an excellent device in the doctor. As a Landman he needs to have everything explained to him and this covers all the most important details. Even after the eleven books I have read this is still the case. Having wiktionary close at hand is always helpful however as some of the words are not explained. These are most often non nautical terms such as cove that come up quite often. The books don't just concentrate on the Navy but also on the unfortunate times that Captains were without a ship and must survive the landsharks.
 So I don't want to reveal too much of the books just yet and I want to keep my final review for when I have finished the full series. However I can recommend that you pick them up, you won't be able to put them down!
September 16, 2011
Sam McHorne
 I slightly over exposed this photograph so the results don't quite show up properly. I was chatting and playing against Owen from the farfaraway blog last night and we were discussing cameras. As mine is nearly eight years old now I think I should invest in a new one. A macro function is the only function mine has... However here is Sam McHorne, leader of the Devil Dogs. I got her finished a few days ago but I was too lazy to take out the camera and get some photographs. I put a little extra effort into the highlighting here and while I wasn't as succesful as I would have liked she has still turned out well. The face and metals are fine but I really do suck at clothing. Grey is also a weakness and as I intend most of my Mercenaries to have this coulur on them somewhere I need to improve my blending of it. I can get browns to blend quite well but grey always ends up streaky. It doesn't help that there isn't an apparent glaze that you can use on this colour.
 Over blues and browns it is easy to mix a glaze but for grey I would have to use black and this means that I often darken the shadows far more than I want to. Has anyone else come up with a good way to glaze grey cloth?
So I am considering what I want to invest in my Mercenary force now. As I have the Risen, Croe's Cutthroats, the Devil Dogy, two 'Jacks and a caster I have a force. I would like to expand it a little though and get to 35 or more points. However this delays my Khador again... a force I am eager to get on the table. Drake McBains theme list is calling and I think this might be the route I will go. It also means I get to paint a good few solos and they are always nice and fun to do.
September 15, 2011
Rusty Swords
So I have once again been practising on my rust techniques. I am currently painting Alexia and the Risen. . At least for this Thrall Warrior it worked out fine. Again I used turpentine washes to get the effect. I used a lot less yellow and browns this time and concentrated more on the orange pigments I have. This gave a nice varability in the rust which is especially good along the edges at the top of the blade where a much brighter orange can be seen. Now I just need to get this to work also on the armour of the various Risen I have still to do. Getting the wash to coat evenly if a problem, it is a wash after all though. The pooling isn't too bad except where it is obviously effected by gravity and large flat armour plates really show this. Resting a model at varoius angles to compensate is just a little bit too intensive though. So having figured out a lot on rust techniques I really want to spend some time on mud and soot. While the first few mud techniques I tried are fine I guess there must be some other nice techniques awaiting to be discovered...
 . At least for this Thrall Warrior it worked out fine. Again I used turpentine washes to get the effect. I used a lot less yellow and browns this time and concentrated more on the orange pigments I have. This gave a nice varability in the rust which is especially good along the edges at the top of the blade where a much brighter orange can be seen. Now I just need to get this to work also on the armour of the various Risen I have still to do. Getting the wash to coat evenly if a problem, it is a wash after all though. The pooling isn't too bad except where it is obviously effected by gravity and large flat armour plates really show this. Resting a model at varoius angles to compensate is just a little bit too intensive though. So having figured out a lot on rust techniques I really want to spend some time on mud and soot. While the first few mud techniques I tried are fine I guess there must be some other nice techniques awaiting to be discovered...
September 13, 2011
Sam McHorne and the Devil Dogs
s. Mainly this has been due to work but I must admit that I have found a computer game that I am really enoying - Terraria. It is not often that I really invest myself in a game but all my scant free time has recently been devoted to this one. 
I have been incredibly distracted over the last two weeks. However yesterday I left my computer in work deliberately so I couldn't play and I got back to doing some painting for a change. This gave me the chance to put some finishing touches onto the Devil Dogs! I still need to give the bases some attention and with that in mind I will be ordering some basing materials from Antenocitis Workshop today. Brass etched plants and some grass tufts are what I am planning on using.

I have been incredibly distracted over the last two weeks. However yesterday I left my computer in work deliberately so I couldn't play and I got back to doing some painting for a change. This gave me the chance to put some finishing touches onto the Devil Dogs! I still need to give the bases some attention and with that in mind I will be ordering some basing materials from Antenocitis Workshop today. Brass etched plants and some grass tufts are what I am planning on using.
September 6, 2011
The Talon Fail
So I managed to get my Talon to a nearly finished state. I am really unhappy with him however!  While the weathering came out generally fine I think it really suits a display piece more and the amount of effort I have still to do to match all the surfaces to this weathered standard probably isn't worth it. I will drop this fellow into some paint stripper this week so I can restart at the weekend. While everything, in weathering terms at least, worked out as I wanted it to I haven't been able to get the grey correct. The scheme is boring and dull for a start. I have picked up about five more vajello greys so I think I can still go for grey but I need to find a more interesting shade. I have found that their military range really has some lovely colours especially in greens, browns and greys. I will have to spend some more time figuring out what is best but I am impressed so far!
The shield worked out a lot better than I thought it might after I had made a few mistakes. The weathering is a little heavy on the bottom but at least it gives a good showing as to how effective the rust washes can be. This surface looks really like it has been out in the weather for a while. The streaks came out okay too though I had to doctor them a little with some basecoat. I am able to get a good streak effect but I am not really able to get it to look small, instead I end up with a really big streak. Breaking this up with some of the original colour is fine enough but I could probably then just paint on the streaks and not have to mess around with turpentine and pigments. I also put some mud effects on parts of the shield. You can see this on top of the boss. I just wanted to see how it might work. I applied it far too heavily but in general it seems fine. Again less is more...
So for me it is off to German Class, this evening I can get this little 'jack into the tub of stripper along with the Nomad so that maybe by the weekend I can have them ready to restart. It's a pity but it has to be done.
 While the weathering came out generally fine I think it really suits a display piece more and the amount of effort I have still to do to match all the surfaces to this weathered standard probably isn't worth it. I will drop this fellow into some paint stripper this week so I can restart at the weekend. While everything, in weathering terms at least, worked out as I wanted it to I haven't been able to get the grey correct. The scheme is boring and dull for a start. I have picked up about five more vajello greys so I think I can still go for grey but I need to find a more interesting shade. I have found that their military range really has some lovely colours especially in greens, browns and greys. I will have to spend some more time figuring out what is best but I am impressed so far!
The shield worked out a lot better than I thought it might after I had made a few mistakes.
 The weathering is a little heavy on the bottom but at least it gives a good showing as to how effective the rust washes can be. This surface looks really like it has been out in the weather for a while. The streaks came out okay too though I had to doctor them a little with some basecoat. I am able to get a good streak effect but I am not really able to get it to look small, instead I end up with a really big streak. Breaking this up with some of the original colour is fine enough but I could probably then just paint on the streaks and not have to mess around with turpentine and pigments. I also put some mud effects on parts of the shield. You can see this on top of the boss. I just wanted to see how it might work. I applied it far too heavily but in general it seems fine. Again less is more...
So for me it is off to German Class, this evening I can get this little 'jack into the tub of stripper along with the Nomad so that maybe by the weekend I can have them ready to restart. It's a pity but it has to be done.
September 5, 2011
A symbol for the Mercs
 So I was thinking a little bit more about my Mercenaries and I was thinking that unlike the Cygnarian or Menite Warjacks they don't really have a symbol anywhere. While the mercenaries are not a faction in their own rights I think it would be nice to unify them a little bit more than is usual. The 'jacks all belong to one 'caster and are a unit right? So why not give them a symbol. I decided to try out the one that Privateer Press suggest. The Nomads shield was the first to get some attention! I am not really sure where else I can place this on a lot of the Warjacks of the faction but I guess I can find a place somewhere.
September 2, 2011
Weathering the Nomad
I also was working on my Nomad at the same time as the Talon I showed on Monday. So I made the same mistakes!  This shot gives a good view of the effect of the turpentine wash. I have since found a better method for the washes, well I wouldn't call it a better method but a better use of this one.
  Basically I should have just layered some rust washes on like I showed yesterday rather than just one. Well these 'jacks are very much trial pieces for when I start on my Khador ones. I added a little bit more salt to this fellow as he is that much bigger. I also guessed that he must get bashed around a lot more too! I packed the salt on especially on the engine as I wanted to see what can be achieved. In these shots you can make out the weathering pigment a little better than on the shots of the Talon. If I was to do this again I would add a lot more varied shades to build up a better effect.
 So I once again followed it up with a nice flat grey basecoat. I am a little worried that this scheme will be boring. I picked up some better greys from Vajello on the way home yesterday and I probably should have gone with something a lot darker. I will accent the models with a very dark trim but I am still worried they will be boring. I am hoping that the weathering can make them stand out.
  I am hoping that over the weekend I can dedicate a day or so to getting these guys finished off but thats probably a little too ambitious. Getting the Talon done would be enough for me! I have been wondering a little about the basing scheme as well. I think something a little more green than usual would also offer a nice contrast and make the models stand out better. Anyway I have to examine some of the newer products I have seen out. Those grass tufts look awesome and I would like some brass etched plants too. I haven't seen anyone really use them much before.
 This shot gives a good view of the effect of the turpentine wash. I have since found a better method for the washes, well I wouldn't call it a better method but a better use of this one.
  Basically I should have just layered some rust washes on like I showed yesterday rather than just one. Well these 'jacks are very much trial pieces for when I start on my Khador ones. I added a little bit more salt to this fellow as he is that much bigger. I also guessed that he must get bashed around a lot more too! I packed the salt on especially on the engine as I wanted to see what can be achieved. In these shots you can make out the weathering pigment a little better than on the shots of the Talon. If I was to do this again I would add a lot more varied shades to build up a better effect.
 So I once again followed it up with a nice flat grey basecoat. I am a little worried that this scheme will be boring. I picked up some better greys from Vajello on the way home yesterday and I probably should have gone with something a lot darker. I will accent the models with a very dark trim but I am still worried they will be boring. I am hoping that the weathering can make them stand out.
  I am hoping that over the weekend I can dedicate a day or so to getting these guys finished off but thats probably a little too ambitious. Getting the Talon done would be enough for me! I have been wondering a little about the basing scheme as well. I think something a little more green than usual would also offer a nice contrast and make the models stand out better. Anyway I have to examine some of the newer products I have seen out. Those grass tufts look awesome and I would like some brass etched plants too. I haven't seen anyone really use them much before.
September 1, 2011
Rust: my new method
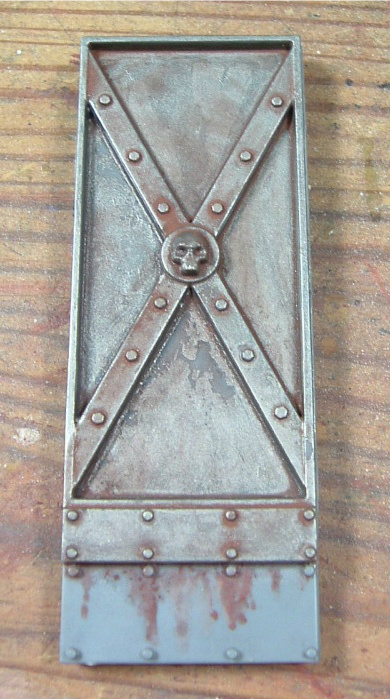
Well I have been swamped with work this week. It seems that the second I find a hobby project I am enthusiastic about I have to spend my evenings in the office instead. So I haven't really been able to put up the posts I wanted as I wasn't able to get everything finished. However I did manage to experiment a little more with some rust techniques and here are a series of photos of the result. Here I had just base coated the top section silver and put on the first wash. The wash is made up of turpentine and some rust pigments. As you can see I was a little eager in my efforts and I removed some of the silver base coating. Thats fine as once everything was dry I could add some more and continue with the process.
  This usually dries quickly but I sped up the process a little by using a hair dryer. i think I will have to start using one more often as it really helps! This second shot shows the third more yellow coat having been applied in the same manner as the previous two. With each coat I simply changed the colour of the rust going from dark to light.
 When it is wet it looks terrible but as it dries it starts to look more and more awesome! You can see here that the previous trouble I had with the basecoat is fixed. The silver I painted on afterwards can't be distinguished at all. I want to use this effet on the 'jacks where there is bare metal showing. It should look fine I guess the only problem I forsee is trying to restrict the washes to where I want them. The turpentine based washes really just go everywhere. By varying the extent and colours of the wash I am guessing that it can really be used to make interesting visual effects. I am suprised at how the colours build up and I am looking forward to trying it with other colours to emulate effets like a dust patina or rain run off on armour. So I need to study a little more and see what I can manage to fit on a 'jack!
 Here I had just base coated the top section silver and put on the first wash. The wash is made up of turpentine and some rust pigments. As you can see I was a little eager in my efforts and I removed some of the silver base coating. Thats fine as once everything was dry I could add some more and continue with the process.
  This usually dries quickly but I sped up the process a little by using a hair dryer. i think I will have to start using one more often as it really helps! This second shot shows the third more yellow coat having been applied in the same manner as the previous two. With each coat I simply changed the colour of the rust going from dark to light.
 When it is wet it looks terrible but as it dries it starts to look more and more awesome! You can see here that the previous trouble I had with the basecoat is fixed. The silver I painted on afterwards can't be distinguished at all. I want to use this effet on the 'jacks where there is bare metal showing. It should look fine I guess the only problem I forsee is trying to restrict the washes to where I want them. The turpentine based washes really just go everywhere. By varying the extent and colours of the wash I am guessing that it can really be used to make interesting visual effects. I am suprised at how the colours build up and I am looking forward to trying it with other colours to emulate effets like a dust patina or rain run off on armour. So I need to study a little more and see what I can manage to fit on a 'jack!
Subscribe to:
Posts (Atom)